Angular9
- May 4, 2020
- 5 min read
Updated: May 25, 2020
Angular is a javascript framework which allows you to create reactive SPA.

Single page application is an app that works inside a browser and do not need page reloading during usage. E.g In app you will be having only one html page and when you click on different urls on app then javascript changes the DOM of one HTML page. Therefore this approach allows you to create web app which look and feel like mobile app. If you do need data from a server, you simply load it in the background so that the user never leaves this experience of having a reactive web application to use.
Development Environment
Install node.js(javascript engine) and npm(catalog of development packages)
$ node -v
$ npm -v
Install Angular-CLI(best way of creating angular projects)
$ npm i -g @angular/cli
$ ng version
Anglar CLI 9.0.1
.
.
.
Install Visual Studio Code(editor) → View → Terminal
Once you have Node.js, NPM, an editor, and a browser, you have enough of a foundation to start the development process.
Create Angular App
$ mkdir ng9Demo
$ cd ng9Demo
$ ng new ng9App
1) would you like to add Angular routing? Y
2) which stylesheet format would you like to use ? Scss
$ cd ng9App
$ ng serve --port 4401
$ ng g s <service_name>
install package
$ npm install --save bootstrap OR npm i bootstrap
$ ng build --prod
3 ways to add Bootstrap to Angular App
1. angular.json
build {
"styles": [
"node_modules/bootstrap/dist/css/bootstrap.min.css",
"src/styles.css"
]
}
2. Index.html file
<link rel="stylesheet" href="../node_modules/bootstrap/dist/css/bootstrap.min.css">
3. styles.css
@import "~bootstrap/dist/css/bootstrap.min.css"
Typescript
It is an open-source programming language developed and maintained by Microsoft.
It is a strict syntactical superset of JavaScript and adds optional static typing to the language that provides much more robust code.
It provides more features than vanilla JS like Types, Classes, Interfaces and strong typing (number, string).
It is designed for development of large applications and compiles into JavaScript.
Development server hosted by the angular CLI or spun up by the CLI will host our angular application. Content we see on browser can be changed by going to app.component.html file in our app folder and only Index.html file is served by the server.
index.html
<html>
<body>
<app-root></app-root>
</body>
</html>
root component of our application, the component which will tie together our whole application in the end.
Whenever ng serve process rebuilds our project it will create javascript bundles and automatically add right imports in the index.html. These script imports will contain our own code too. So, these script files are therefore executed and they’re actually the first code to be executed.
main.ts
platformBrowserDynamic().bootstrapModule(AppModule)
.catch(err => console.error(err));
Line starts our angular application by passing AppModule to this method.
@Component Decorator
Component is a key feature in angular. You build your whole application by composing it from a couple of components which you create on your own.
Each component has its own template, its own html code and maybe its own styling and more importantly also its own business logic. It allows you to split up your complex webpage into reusable parts i.e you may use a component more than once and that allows you to easily replicate that business logic, replicate that styling or in general, make a finely controlled piece in your application without having to crunch everything into one single script file, one single HTML file, instead it’s very easy to update, very easy to exchange and again re-usable.
Create your own component
1. First of all, a component is simply just a Typescript class, so that Angular is able to instantiate it to create objects based on the blueprint we set up here you could say.
@Component({
selector: ‘app-abc’
templateUrl: ‘./abc.component.html’
})
export class ABCComponent {
}
2. It’s almost ready to be used but to use it, we need to change something in our app module. New component has to be registered here in the app module so that Angular knows that this component exists.
@NgModule({
declarations: [
AppComponent,
ABCComponent
],
imports: [
BrowserModule,
AppRoutingModule
],
providers: [],
bootstrap: [AppComponent]
})
export class AppModule { }
3. And after adding to app module then add selector <app-abc></app-abc> in app.component.html to display it on the page.
We can also use CLI command to create a new component as below:-
$ ng g c <component_name>
Component Styling
Data Binding
Communication between your typescript code(business logic) of your component(.ts) and the template(.html), so what the user sees because you might have some result in your typescript code.
Different ways of communication:-
1) want to output data from typescript code to the html code in the template <=> String interpolation/ Property Binding
2) want to react to events <=> event binding
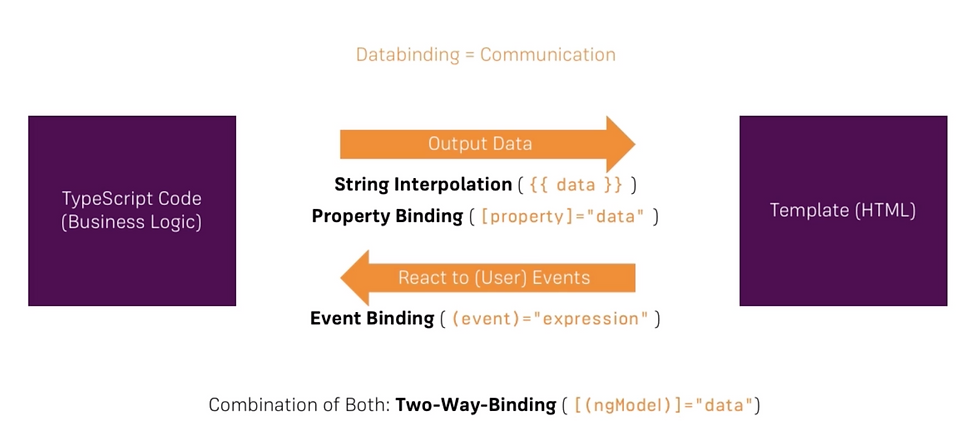
String Interpolation
In between double curly braces, you can write a typescript expression. Here, data is a property of typescript class and using {{ data }} will display value of the property.
Also, you could use any expression which can be resolved to a string in the end.
e.g {{ 1+1 }} => display 2 in template OR you could call a method here which returns a string in the end.
Only restriction is you can't write multi-line expressions/block expressions here. But could use ternary expression though.
Property Binding Square brackets [ ] indicate to angular that we are using property binding, that we want to dynamically bind some property. So, to make HTML button disabled functionality dynamic, we can bind to it by enclosing it in square brackets. In the end, in normal HTML, only sets a specific property on the underlying DOM element. <button disabled> Add </button> <button [disabled] = "<typescript_expression"> Add </button>
In between the quotation marks, an expression which for this property resolves to a boolean.(true/false) And for other HTML element properties, another type might be required. Besides binding to HTML element properties we can also bind to other properties like directives or our own component. Event Binding Parentheses ( ) indicate to angular that we're using event binding, that we want to listen events. So, to listen HTML button click event and typically, you have the onClick attribute on HTML element where you can execute some js code. We won't use that with Angular though. Here we have the syntax Angular offers us. <button (click)= "<typescript_method>"> Add </button>
In between the quotation marks, we put the code/call the method we want to execute once this event occurs. Passing and Using Data with Event Binding Listen to the input event(DOM event) provided by input element which is fired whenever the user types and here we could execute onUpdateMethod() because it will be fired on every keystroke. <input type="text" class="form-control" (input)="onUpdateMethod($event)"> $event is kind of a reserved variable name when using event binding in the template. $event will simply be the data emitted with that event. onUpdateMethod(event: any){ } Two-way Binding
It is simple way of binding in both directions. We combine property and event binding, therefore by combining square brackets and parentheses together. Now here, we have to use a special directive @NgModel. <input type="text" class="form-control" [(ngModel)]="<typescript_expression"> FormsModule is required for 2 way binding. ngModel Directives These are the instructions in the DOM that enhance the capability of HTML elements.
1) attribute - manipulating appearance and behaviour of DOM elements:- ngStyle, ngClass
2) structural - changing the structure of DOM:- ngIf, ngFor, ngSwitch
3) components - directives with templates. Component is a cleaner version of directives with a template.
E.g:- Components are kind of such instructions in the DOM. Once we place the selector of our component somewhere in our templates at this point of time we're instructing Angular to add the content of our component template and business logic in our typescript code in this place where we use the selector. We typically add directives with an attribute selector. Angular usage- it makes it very easy for you to interact with your DOM, to change something there at runtime.
@NgModule Decorator


Comments